Pathogen
r/PathogenGame Join the beta

In a Run

Procedural organs, sealed doors and genes, special rooms and room traits, traits across seven tiers, shot synergies, elemental power-ups, CRISPR and extra lives. No two runs play the same.

8organs in a full run
12room types
35in-run traits
10shot synergies
9 / 7room boons / drawbacks
5trade-off altar offers
3genes that open sealed doors
4most waves in one fight

Before the first room

Starting a Run

Every Infect Game Mode run starts by infecting a host, then dropping into the first room of an organ. As your lineage grows, you can choose a deeper starting point and new systems are introduced one organ at a time.

Infect a Host

Run start

Each run lands on a random host behind a big "INFECTED" title, then the run begins underneath it.

  • Usually a person; about 1 run in 5 lands on one of the setting's animals instead, which joins your Codex
  • Once Hosts & Host Traits are introduced (Generation 2), a host reveal card shows the host before you go in
  • In Pandemic Game Mode the hosts are the chosen city's people and wildlife

Choose Your Point of Entry

Level 3 · Gen 2

Once your lineage has reached deeper organs, a map of 8 area cards lets you start in any organ you've already reached.

  • Unlocks with the "Start in deeper areas" milestone (Level 3, Generation 2)
  • Cards read AREA 1 to AREA 8; each shows the organ and its boss, and unreached areas stay greyed out
  • Area 1 (Nasal Passage) is the normal start
  • Backing out of the picker is free: nothing is spent until the run begins

Head Start Draft

Deeper start

Starting past the first organ opens a draft: pick 6 traits from a pool of 20 to make up for the skipped organs.

  • Always 6 picks, however deep you start
  • The pool can repeat a trait; picking it twice stacks it
  • Tier odds in the pool improve the deeper you start
  • The first time you reach an organ, a card announces it as a new starting point

Action Buttons Open One at a Time

New saves

On a brand-new save only DASH is on screen; your signature ability appears after your first finished run and the ultimate after your second.

  • Each new button arrives with a NEW notice explaining how it charges
  • The SKILL button appears once you equip an active skill from the skill tree

First-Encounter Briefings

Learning

The first time you meet an enemy, boss, room type, hazard or system, a short notice appears at the bottom of the screen without pausing.

  • The full briefing (In Game and Real World tabs) stays in the pause menu for the rest of the run
  • Meeting something also unlocks its Codex entry

Runs That Grow With You

Onboarding

Brand-new saves fight in compact single-screen rooms with one wave; bigger rooms, narrow corridors and longer fights open up as your lineage grows.

  • Growth follows your best virus's level (full at Level 12) and longest lineage (full at 6 generations)
  • Fight rooms grow from 1 screen of floor up to about 4 screens
  • Fights grow from 1 wave up to 4 waves, and waves fill out from 80% to the full number of cells

Procedural organs

The Organ Map

Each organ is a branching map of connected rooms, generated fresh every run: different layout, room count, room sizes and mix of room types. Beat the boss at the far end to descend to the next organ, all the way from the Nasal Passage to the Brain.

Branching Room Maps

Every organ

The map grows as a tree outward from the start room, so it always has clear dead ends and no loops.

Details
  • The boss waits at the deepest dead end, at least 3 rooms from the start
  • Every organ has one Mutation Chamber at another dead end and one Gene Chamber
  • Special rooms never sit side by side: there is always a fight room between them
  • Room counts include the start, Mutation Chamber and boss rooms; some strains add or remove rooms

Start Room

Room type

Where you arrive in each organ: a calm, already-cleared single-screen room.

Details
  • Never rolls a room tier
  • Arriving in a new organ shows the organ's name and goal

Fight Rooms

Room type

Most rooms are fights, and they come in many sizes and silhouettes, some sprawling past the screen.

Details
  • Sizes from 1×1 screen up to 2.2×1.8 screens, plus narrow corridors (2.4×0.55 and 0.62×2.0)
  • Shapes: rectangle (about 40%), L-shape, cross, U-shape and, in big rooms, ring
  • About 45% have inner tissue walls; tissue nodules give cover
  • Clear lanes always run from every door to the centre
  • Fight rooms count toward the "x/y fights" progress shown on the HUD

Waves

Combat

The first wave waits around the room unaware of you; later waves pour in as reinforcements already hunting you.

Details
  • Nasal Passage: 1 wave near the start, 2 waves from 3 rooms deep
  • Later organs: 2 waves, 3 from 3 rooms deep
  • Big rooms add a wave and huge rooms another, up to 4
  • Reinforcement waves are about 60% the size of the first, arriving 0.8 s after a wave falls
  • A WAVE n / total banner announces each wave, with FINAL WAVE in red

Doors

Combat

Doors seal while anything is hunting you and stay sealed between waves until the room is cleared.

Details
  • Boss rooms stay sealed until the boss dies; Immune Siege and Lysis Chamber stay sealed while their timers run
  • Tumor rooms never lock, so you can always walk away from a cancer
  • Once you've seen a room, its door glows in that room's colour: boss orange, Mutation Chamber gold, puzzle blue, altars and Mutagenic Pool purple, Gene Chamber teal, Siege red, Lysis Chamber amber, Refuge green, tumor pink

Clearing a Fight

Rewards

Clearing a fight room heals you and can leave loot behind.

Details
  • Heals 10% of max HP (bosses too)
  • 35% chance of a mutation orb
  • 7% chance of a vesicle chest
  • A rival virus may show up afterwards (6%, once Rival Viruses unlock)
  • 3% chance of a run modifier drop (30% from bosses) once Run Modifiers unlock

Boss Room & Descending

End of organ

Beat the organ's boss to open a passage to the next organ; you're asked to confirm, because there's no coming back.

Details
  • The boss room is drawn double-size on the minimap with a skull
  • Beating the boss drops a mutation orb, a named gear set piece and Chaperone Proteins, with a chance of a Dormant Virion
  • The prompt warns how many rooms are still unexplored
  • Descending heals 50% of max HP
  • Beating the Brain's boss, the Microglia, wins the run: the host is fully infected

Arriving in a New Organ

Transition

Each organ is a clean slate for pickups and power-ups, but some threats follow you down.

Details
  • Anything left on the previous organ's floor stays behind
  • Running power-ups and CRISPR wear off
  • Killer T cells lose your trail
  • A tumor you left alive follows you down as a metastasis

Pushing Deeper in One Run

Difficulty

In Infect Game Mode, every organ you advance past your starting organ in a single run makes cells tougher.

Details
  • +40% enemy health and damage per organ beyond where the run started
  • Starting deeper resets this, so a fresh deep start meets the organ at its base strength

Leftovers

Exploration

Pickups you didn't collect stay exactly where they were: leave a room and come back, and they're still there.

Details
  • Covers nucleotides, materials, gear, Dormant Virions and untaken mutation orbs
  • A fight you walked out of mid-wave resumes from the wave you reached

Nasal Passage

Organ 1

The first organ: find and defeat the Mast Cell.

Details
  • 12–16 rooms
  • Gene: Mucolytic Enzyme (opens mucus plugs)
  • Mucus puddles in rooms slow you to 40% speed
  • Hazards: sneezing nerve endings, cilia carpets
  • Smallest boss arena of the run

Lungs

Organ 2

Reach the Alveolar Macrophage.

Details
  • 14–18 rooms
  • Gene: Fusion Peptide (opens tight junctions)
  • Hazards: coughing nerve endings, cilia carpets, air sacs

Bloodstream

Organ 3

Ride the current to the Plasma Cell.

Details
  • 17–21 rooms
  • Gene: Plasminogen Activator (opens fibrin clots)
  • Hazard: drifting red blood cells; no nerve endings in the blood

Lymph Node

Organ 4

Break the Follicular Helper T Cell's command.

Details
  • 18–22 rooms
  • Gene: Plasminogen Activator
  • Hazard: reticular fibres

Gut

Organ 5

Get past the Paneth Cell's defensins.

Details
  • 19–23 rooms
  • Gene: Mucolytic Enzyme
  • Hazard: peristalsis waves

Liver

Organ 6

Survive the Kupffer Cell's filter.

Details
  • 20–24 rooms
  • Gene: Fusion Peptide
  • Hazard: bile ducts
  • From here on, mutation orb offers are never Common

Bone Marrow

Organ 7

Take over the Hematopoietic Stem Cell.

Details
  • 21–25 rooms
  • Gene: Mucolytic Enzyme
  • Hazard: stem cell niches

Brain

Organ 8

Cross the barrier and defeat the Microglia to win the run.

Details
  • 22–26 rooms
  • Gene: Fusion Peptide
  • Hazard: synapses
  • Blood-brain barrier: every cell here takes 38% less damage

Metroidvania gates

Sealed Doors & Genes

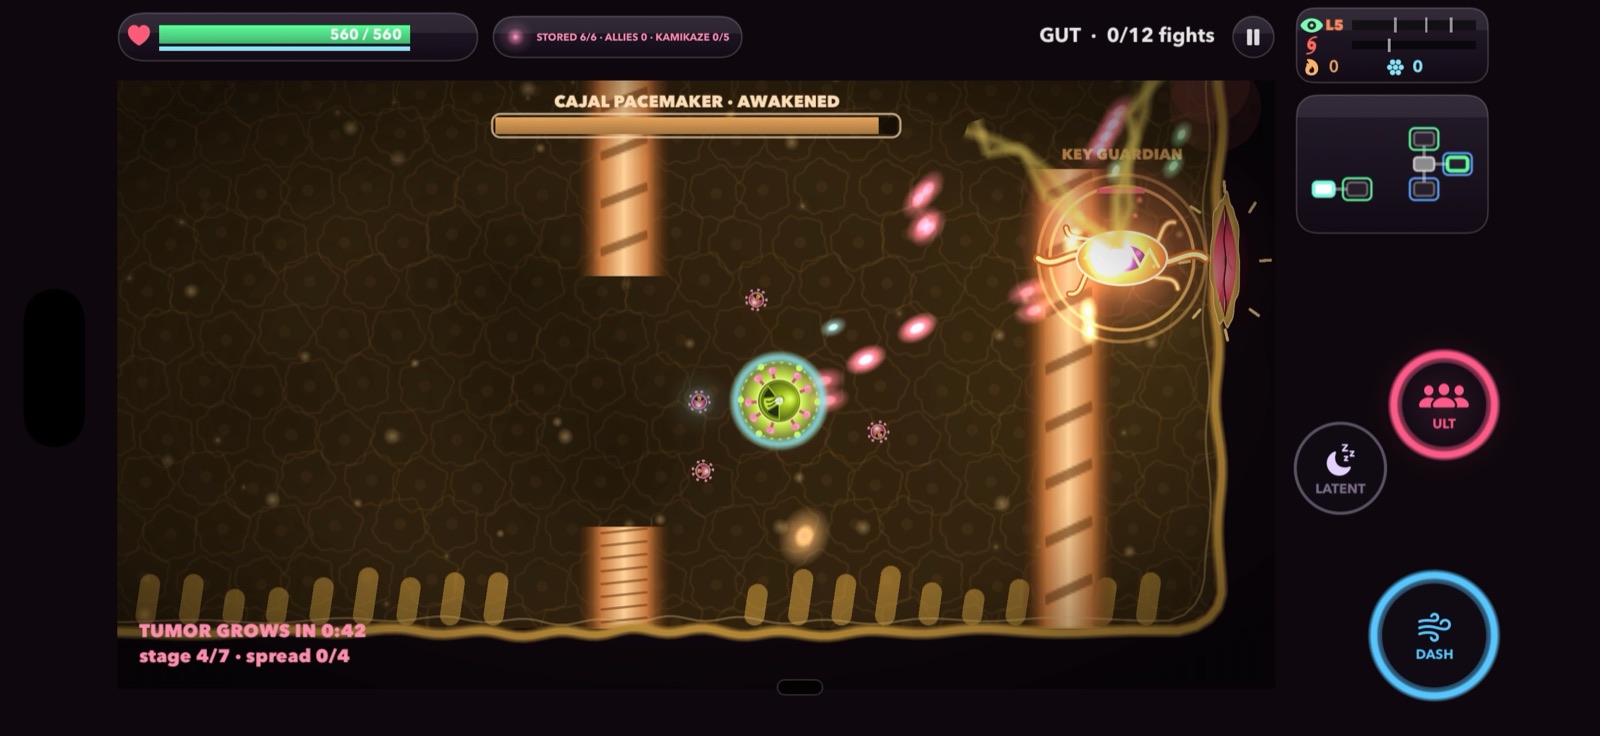
Every organ seals one door until you carry that organ's gene. The gene waits in a Gene Chamber, guarded by a key guardian mini-boss, somewhere you can reach without passing the sealed door.

Sealed Door

Gate

A door the host has sealed shut: a mucus plug, a tight junction or a fibrin clot.

  • One per organ, usually on the way to the boss; otherwise (about a third of the time) in front of the Mutation Chamber
  • Walking into it says which gene you need
  • On the minimap the sealed link is drawn in the gene's colour
  • Carrying the gene dissolves it for good, on both sides

Mucolytic Enzyme

Gene

Dissolves mucus plugs, and mucus no longer slows you.

  • Found in the Nasal Passage, Gut and Bone Marrow

Fusion Peptide

Gene

Slips through tight junctions, and your dash damages cells you pass through.

  • Found in the Lungs, Liver and Brain
  • Each dash hit deals 25 damage, even through a Transcytosis teleport

Plasminogen Activator

Gene

Dissolves fibrin clots, and platelet clots no longer slow you.

  • Found in the Bloodstream and Lymph Node

Not every room is a fight

Special Rooms

Special rooms play by their own rules and are outlined in colour on the minimap. The Mutation Chamber and Gene Chamber are in every organ; altars, puzzles and event rooms arrive with the Special Rooms mechanic (Level 3), and tumor rooms with Tumors & Metastasis (Level 7).

A key guardian in the Gut

Mutation Chamber

Every organ

An upgrade room where a loose strand of DNA drifts: a free mutation orb, a vesicle chest and a few nucleotides.

  • One per organ, at a dead end
  • Touch the orb to choose 1 of 3 traits
  • Also drops 8 nucleotides
  • Its sign reads UPGRADE CHAMBER

Gene Chamber

Every organ

A key guardian holds this organ's gene; beat it, then take the gene to open the sealed door.

  • Usually tucked in a dead end
  • The gene appears where the guardian stood
  • The gene also grants a lasting passive bonus for the run

Receptor Puzzle

Puzzle

Bind all the receptors at once: light every pad before the first one fades.

  • 3–4 pads on a ring around the room
  • Each pad stays lit 4.5 s after you step off
  • At most one puzzle per organ (45% of organs)

Signal Puzzle

Puzzle

Repeat the signal: watch 4 pads flash in order, then step on them in the same order.

  • A wrong pad shows WRONG SIGNAL, raises Detection and replays the signal
  • Shares the one-puzzle-per-organ slot with the Receptor Puzzle

Puzzle Reward

Reward

Solving either puzzle releases a strand of DNA and a pile of loot.

  • A mutation orb, a vesicle chest, 10 nucleotides and 2 Chaperone Proteins
  • Detection drops by 10
  • In Pandemic Game Mode, a chance of an RNA Strand

Trade-off Altars

Choice room

A crossroads of 2–3 altars, each a bargain: something strong for a price. Step onto one, or walk away.

  • Offers are drawn from 5 bargains
  • Only one can be taken
  • Appears in about 60% of organs, and always in the organ that introduces special rooms

Immune Siege

Event room

The doors seal and reinforcements keep pouring in; survive the timer for a reward.

  • Lasts 22 seconds
  • A fresh squad arrives every 4.5 s: 3 cells in the Nasal Passage, one more per organ deeper
  • Squads are neutrophils, B cells and macrophages (platelets, NK cells and neutrophils in the Bloodstream)
  • Survive and the room's cells retreat, leaving a vesicle chest and a mutation orb
  • Being knocked out fails the room, not the run: you recover to the health you came in with

Mutagenic Pool

Event room

Bathe in the pool for a random trait, often a rare one, at a price.

  • Costs 20% of your current HP (it can't kill you)
  • The trait's tier odds are boosted: never Common
  • One use

Lysis Chamber

Event room

The doors seal around 9 host cells: burst as many as you can in 18 seconds.

  • Every host cell drops nucleotides
  • Burst them all for a vesicle chest and a mutation orb
  • If time runs out, the rest escape
  • Being knocked out fails the room, not the run

Refuge

Event room

A quiet host cell: slip inside to heal and lose the immune system.

  • Heals 50% of max HP
  • Detection drops by 30
  • Hunting cells lose track of you (bosses and Killer T cells don't)
  • One use

Event Room Frequency

Map

Each organ holds two or three different event rooms, picked from Immune Siege, Mutagenic Pool, Lysis Chamber and Refuge.

  • Each kind appears at most once per organ
  • Event rooms and altars are hidden until the Special Rooms mechanic unlocks at Level 3

Tumor Room

Level 7 unlock

A cancer grows here, a different one in every organ; destroy it for a huge payout before it spreads.

  • Grows in about 70% of organs once Tumors & Metastasis is introduced
  • The doors never lock: you can back out, but it keeps growing and spreading while you're away
  • The HUD tracks its stage and spread
  • Left alive, it follows you into the next organ

Every gift has a price

Trade-off Altar Offers

Each Trade-off Altars room shows 2–3 of these 5 bargains. Take one and the rest vanish. Max HP can never drop below 30.

Cytolytic Pact

Altar

Trade toughness for power.

  • −25% max HP
  • +40% damage

Hypermutation

Altar

Two random traits at once, for a chunk of health.

  • 2 random traits
  • −15 max HP

Dormancy

Altar

A full heal that gets you noticed.

  • Heal to full
  • Detection +30

Thin Envelope

Altar

Faster but more fragile.

  • +25% move speed
  • −20 max HP

Scavenge Debris

Altar

Grab a pile of nucleotides and raise the alarm.

  • +40 nucleotides (10 of each base)
  • Detection +25

Level 11 unlock

Room Tiers

Once Room Tiers are introduced, every room except the start rolls a tier from Common to Prismatic. Higher tiers carry more boons and more drawbacks, and they only apply while you're inside. The minimap outlines each room in its tier colour, and the pause menu lists the current room's traits. Opposite traits never share a room.

Common Room

Tier 1

A plain room with no traits.

  • 45% of rooms in the Nasal Passage, falling to about 20% in the Brain

Uncommon Room

Tier 2

1 boon, no drawbacks.

  • About 25% of rooms in every organ

Rare Room

Tier 3

1 boon and 1 drawback.

  • 15% of rooms in the Nasal Passage, about 24% in the Brain

Epic Room

Tier 4

2 boons and 1 drawback.

  • 9% of rooms in the Nasal Passage, about 16% in the Brain

Legendary Room

Tier 5

2 boons and 2 drawbacks.

  • 4% of rooms in the Nasal Passage, about 9% in the Brain

Mythic Room

Tier 6

3 boons and 2 drawbacks.

  • 1.5% of rooms in the Nasal Passage, 4% in the Brain

Prismatic Room

Tier 7

3 boons and 3 drawbacks, outlined in cycling rainbow colours.

  • 0.5% of rooms in the Nasal Passage, about 1.7% in the Brain

Boons and drawbacks

Room Traits

The 16 traits a tiered room can carry: 9 boons and 7 drawbacks. Their effects last only while you're in that room.

Nutrient-Rich

Boon

+60% nucleotides.

Details
  • Opposite of Barren

Weakened Defenses

Boon

Cells have 25% less HP.

Details
  • Opposite of Fortified

Sluggish Cells

Boon

Cells move 20% slower.

Details
  • Opposite of Frenzied

Receptive Tissue

Boon

You deal 20% more damage.

Quiet Tissue

Boon

Detection rises 50% slower.

Details
  • Opposite of Alarmed

Mutagenic

Boon

Clearing the room always leaves a mutation orb.

Hidden Cache

Boon

Clearing the room leaves a vesicle chest.

Restorative

Boon

Clearing the room heals 20% of max HP.

Details
  • Shows RESTORED

Charged

Boon

Power-ups drop 3 times as often.

Details
  • Applies to elemental power-ups and CRISPR

Barren

Drawback

−50% nucleotides.

Fortified

Drawback

Cells have 30% more HP.

Frenzied

Drawback

Cells move 20% faster.

Inflamed

Drawback

Cells hit 25% harder.

Alarmed

Drawback

Detection rises 60% faster.

Elite Garrison

Drawback

Elite cells are 2.5 times as common.

Acidic

Drawback

You lose 1 HP per second while cells are hunting you.

Details
  • Never takes you below 1 HP

The tissue fights back

Hazards, Pits & Shafts

Hazards arrive with the Hazards mechanic (Level 8); the organ that introduces them puts hazards in every fight room. Each organ has its own family, and they hurt cells as readily as they hurt you, so lure the immune system into them.

Abyss Pits

Hazard

Bottomless gaps in the tissue. Dash over them; stop on one and you fall.

  • About 35% of fight rooms have them: 1–2 pits, up to 4 in big rooms
  • Falling in costs 35% of your max HP and you climb out at the edge; it only kills if that takes you to 0
  • Cells shoved into a pit fall in and die
  • Falling during a Siege or Lysis Chamber fails the challenge instead of hurting you

Drop Shaft

Shortcut

A glowing shaft: walk in and the current sweeps you into a freshly reshuffled layout of the same organ.

  • About 15% of organs hide one, at least 2 rooms deep
  • Shows SWEPT AWAY when you land in the new layout
  • Marked with a teal dot on the minimap once found

Mucus Puddles

Nasal Passage

Sticky puddles that slow you to 40% speed while you stand in them.

  • In every Nasal Passage room, from the very first run
  • The Mucolytic Enzyme gene makes you immune

Nerve Endings

Nasal & Lungs

Glowing nerve fibres in the walls: linger on one, or shoot it, and it fires a reflex blast that flings everything nearby.

  • A sneeze in the Nasal Passage, a stronger cough in the Lungs
  • 1–3 in about 45% of Nasal Passage and 40% of Lungs fight rooms; 3 in every boss room
  • Raises Detection if you set it off by touch; shooting it doesn't
  • Recharges after 7 s; cells flung into an abyss die

Cilia Carpet

Nasal & Lungs

Beating hairs that carry anything on them the way the arrows point.

  • In about 35% of fight rooms (1–2 carpets)
  • Dash to cross against the flow, or let it sweep cells into pits

Air Sacs

Lungs

Alveoli on the walls swell, then exhale a gust that blows you and cells away and clears enemy shots.

  • In about 50% of Lungs fight rooms (1–2)

Red Blood Cells

Bloodstream

Solid cells drifting with the flow that shove you around and soak up shots from both sides.

  • In about 60% of Bloodstream fight rooms (4–6 at a time)
  • Three of your shots burst one; a fresh one drifts in from upstream

Reticular Fibres

Lymph Node

Fibres strung across the room that slow you to under a third of your speed and snag cells too.

  • In about 50% of Lymph Node fight rooms (2–3 fibres)
  • Two shots snap a fibre

Peristalsis

Gut

Every few seconds the gut wall clenches and a wave sweeps the room, carrying everything with it.

  • In about 45% of Gut fight rooms
  • Watch for the flashing band, then dash through it

Bile Duct

Liver

Ducts in the walls spray a jet of bile across the room after a flashing warning line.

  • In about 50% of Liver fight rooms (1–2)
  • Burns cells far worse than it burns you

Stem Cell Niche

Bone Marrow

A pod of young blood cells: burst it to heal, but fresh neutrophils pour out.

  • In about 50% of Bone Marrow fight rooms (1–2)
  • Heals 12% of max HP; touch or shoot it to burst it
  • Releases two neutrophils

Synapse

Brain

Two neurons that fire an electric arc between them every few seconds after a flickering warning.

  • In about 50% of Brain fight rooms (1–2 pairs)
  • The arc hurts cells; shoot a neuron to fire it early

Mutation orbs

Traits

Mutation orbs offer 3 traits and you choose 1 for the rest of the run (the game pauses while you pick). Each card shows the trait's tier, the tiers you already hold and any synergy it would unlock. Picking the same trait again stacks it: stat traits compound per pick, the rest add their strength together. Values below run from a Common pick to a Prismatic pick. Some families unlock as your virus levels up: status traits at Level 2, projectile traits at Level 4, defence traits at Level 9; power-up traits need Power-ups (Level 2), the cancer trait needs Tumors & Metastasis (Level 7).

Virulence

Stat

Raises your damage.

Details
  • +12% (Common) · 16% · 19% · 24% · 30% · 38% · +50% (Prismatic)
  • Compounds with every pick

Rapid Replication

Stat

You fire faster.

Details
  • 8% faster (Common) up to 34% faster (Prismatic)
  • Compounds with every pick

Streamlined Capsid

Stat

Raises your move speed.

Details
  • +6% (Common) up to +25% (Prismatic)
  • Compounds with every pick

Lipid Envelope

Stat

Raises max HP and heals that much.

Details
  • +15 (Common) · 20 · 24 · 30 · 38 · 48 · +63 (Prismatic)
Segmented Genome

Stat

Adds projectiles to every shot.

Details
  • +1 projectile per shot; +2 at Mythic or Prismatic
  • Offered rarely, and rarer still each time you take it

Neuraminidase Boost

Stat

Shots pierce through extra cells.

Details
  • +1 pierce (Common–Rare), +2 (Epic, Legendary), +3 (Mythic), +4 (Prismatic)
  • One of the five shot-changing traits that form synergies

Reassortment

Stat

Your signature ability charges faster and refills right away.

Details
  • Charges 30% faster (Common) up to 126% faster (Prismatic)
  • Compounds with every pick

Pyrogenic Fever

Effect · Level 2

Shots set cells burning.

Details
  • 4 damage/s (Common) up to 17 damage/s (Prismatic), for 3 s

NSP4 Enterotoxin

Effect · Level 2

Shots poison cells, stacking up to 10 times.

Details
  • 1.5 damage/s per stack (Common) up to 6.3 (Prismatic)

Cold Adaptation

Effect · Level 2

Shots have a 30% chance to slow a cell for 2 s.

Details
  • Slows by 25% (Common) up to 57% (Prismatic); never more than 60%
  • One slow at a time per cell

M2 Ion Channel

Effect · Level 2

Shots turn electric: they tear through shields, can shock, and arc to a nearby cell.

Details
  • +60% damage to shields (Common) up to +252% (Prismatic)
  • Doesn't affect armor

Lytic Burst

Projectile · Level 4

Shots burst on impact, hurting cells around them.

Details
  • Burst deals 40% (Common) up to 168% (Prismatic) of the shot's damage
  • The blast grows with each pick
  • Shot-changing trait (synergies)

Cell-to-Cell Spread

Projectile · Level 4

Shots jump on to more cells for 60% damage.

Details
  • 1 jump (Common, Uncommon), 2 (Rare–Legendary), 3 (Mythic, Prismatic)
  • Shot-changing trait (synergies)

Fomite Ricochet

Projectile · Level 4

Shots bounce off walls and tissue.

Details
  • 1 bounce (Common, Uncommon), 2 (Rare, Epic), 3 (Legendary, Mythic), 4 (Prismatic)
  • Shot-changing trait (synergies)

Endosomal Recycling

Projectile · Level 4

Shots fly out to full range and come back, hitting again on the return.

Details
  • Each extra pick adds another round trip at 60% of the previous trip's damage
  • Offered rarely, rarer each pick
  • Shot-changing trait (synergies)

Satellite Virus

Projectile · Level 4

Satellite virions orbit you and hit cells they touch.

Details
  • 1 satellite (Common) up to 4 (Prismatic), at most 8 in total
  • 10 damage each (Common) up to 23 (Prismatic)

Syncytial Pulse

Projectile · Level 4

You pulse damage around you on a timer.

Details
  • Every 3.0 s for 12 damage (Common) to every 2.4 s for 50 (Prismatic); never faster than every 1.5 s

Lateral Budding

Projectile · Level 4

Small homing darts bud off both your sides on a timer.

Details
  • Every 1.5 s (Common) down to 0.7 s at most
  • Each dart deals 45% (Common) up to 77% (Prismatic) of your damage
  • Every 2 strength adds another pair, up to 3 pairs
  • Darts don't carry your other shot traits

Stolen Membrane

Defence · Level 9

A shield that soaks hits and recharges.

Details
  • 16 shield (Common) up to 67 (Prismatic)
  • Recharges after 6 s without damage
  • Shown as a cyan line under your health bar

Glycan Armor

Defence · Level 9

Armor that absorbs 35% of each hit and regrows.

Details
  • 24 armor (Common) up to 101 (Prismatic)
  • Regrows after 7 s without damage
  • Shown as a grey line under your health bar

Incubation Period

Survival · Level 9

+1 extra life: next time you'd die, you go dormant and respawn.

Details
  • Revive with 40% health (Common) up to 72% (Prismatic), never more than 75%
  • Very rarely offered, rarer each pick
  • Also needs the Extra Lives mechanic (Level 5)

Shedding Burst

Dash

Every dash bursts where you leave, then leaves a ring that keeps hitting.

Details
  • Burst: 18 damage (Common) up to 76 (Prismatic)
  • Ring: 6 up to 25 damage every half second
  • More dash-burst levels make the ring bigger and longer-lasting

Febrile Wake

Dash · Level 2

Dash bursts leave a ring that sets cells burning.

Details
  • 6 damage/s (Common) up to 25 (Prismatic), for 3 s
  • Shares one ring with your other dash-burst traits

Toxic Wake

Dash · Level 2

Dash bursts poison cells and leave a toxic ring.

Details
  • The burst adds 2 (Common) up to 8 (Prismatic) poison stacks
  • The ring adds 1 more stack every half second

Cold Snap

Dash · Level 2

Dash bursts leave a chilling ring that can slow cells for 2 s.

Details
  • Slows by 30% (Common) up to 60% (Prismatic)

Ion Surge

Dash · Level 2

Dash bursts leave a charged ring that jolts cells.

Details
  • Jolt: 10 (Common) up to 42 (Prismatic)
  • Then 14 up to 59 electric damage per hit

Aerosol Plume

Dash

Makes dash bursts and their rings bigger.

Details
  • 30% bigger (Common) up to 126% (Prismatic)
  • Only offered once you hold a dash-burst trait

Transcytosis

Dash

Your dash becomes a teleport through cells and tissue walls.

Details
  • Reaches 20% farther (Common) up to 52% (Prismatic)
  • Lands at the farthest safe spot along the line, never in a wall or pit

Helper Virions

Companion

A little helper virion follows you and shoots the nearest cell every 1.1 s.

Details
  • Each shot deals 28% (Common) up to 54% (Prismatic) of your damage
  • Each pick adds another helper, up to 4

Guide RNA Library

Power-up · Level 2

Every power-up, CRISPR included, lasts longer.

Details
  • +2.5 s (Common) up to +10.5 s (Prismatic)

Spacer Acquisition

Power-up · Level 2

Every power-up, CRISPR included, appears more often.

Details
  • +60% (Common) up to +252% (Prismatic)

Cas Cascade

Power-up · Level 2

Every power-up starts and ends with a blast around you.

Details
  • 4× your damage (Common) up to about 9× (Prismatic)
  • The blast grows with each pick

Gene Drive

Power-up · Level 2

Every kill while a power-up is running keeps it going longer.

Details
  • +0.4 s per kill (Common) up to +1.7 s (Prismatic)
  • With CRISPR, every cell you cut extends it

Elemental Potency

Power-up · Level 2

Elemental power-ups are stronger.

Details
  • +30% (Common) up to +126% (Prismatic)

Oncolytic Payload

Cancer · Level 7

Deal more damage to tumors and their cells.

Details
  • +40% (Common) up to +168% (Prismatic)
Common to Prismatic

Trait Tiers

Every offered trait rolls a tier that multiplies its strength. The odds below are for the Nasal Passage; every organ deeper raises the odds of every tier above Common, and from the Liver on, offers are never Common. The Mutagenic Pool's boosted roll is never Common either. Your virus's milestones cap the tier: Rare at first, Epic from Level 7, and up to Prismatic from Level 11 with 4 generations.

Common

×1 strength

The baseline tier.

  • 50% of offers in the Nasal Passage

Uncommon

×1.3 strength

Green tier.

  • 27% of offers in the Nasal Passage

Rare

×1.6 strength

Blue tier, the highest a new virus can roll.

  • 14% of offers in the Nasal Passage

Epic

×2 strength

Purple tier.

  • 6% of offers in the Nasal Passage
  • Unlocks with "Epic & better traits" at Level 7

Legendary

×2.5 strength

Orange tier.

  • 2.5% of offers in the Nasal Passage
  • Unlocks with "Legendary & mythic traits" (Level 11, Generation 4)
Mythic

×3.2 strength

Red tier.

  • About 0.4% of offers in the Nasal Passage
  • Segmented Genome gives +2 projectiles from this tier

Prismatic

×4.2 strength

The top tier, shown in cycling rainbow colours.

  • About 0.12% of offers in the Nasal Passage, roughly 0.3% in the Brain

Shot-trait pairs

Synergies

Five traits change how your auto-attack behaves: Endosomal Recycling (return), Neuraminidase Boost (pierce), Fomite Ricochet (bounce), Lytic Burst (burst) and Cell-to-Cell Spread (chain). Every pair has its own synergy, there's no limit, and each one switches on with a SYNERGY toast the moment you hold both. Extra projectiles and Lateral Budding darts aren't part of it.

Shredder

Recycling + Neuraminidase

Returning shots already pass through cells, so pierce becomes power.

  • Every cell a shot cuts through adds +10% damage per pierce for the rest of its trip, up to +100%

Rebound

Recycling + Fomite

Every bounce becomes an extra round trip: shots fly back out again instead of fading.

Turnaround Burst

Recycling + Lytic

Shots burst at the point where they turn around, right in the crowd.

Live Wire

Recycling + Spread

Shots on their way back zap the nearest cell.

  • A zap every 0.3 s for 35% damage

Ricochet Drill

Neuraminidase + Fomite

Each bounce restores a pierce and adds damage.

  • +15% damage per bounce

Fragmentation

Neuraminidase + Lytic

After passing through a cell, a shot's bursts get wider and stronger.

  • Bursts 50% wider and 25% stronger

Arc Through

Neuraminidase + Spread

Chain jumps pierce like the shot that started them.

Cluster Bounce

Fomite + Lytic

Every bounce off a wall sets off a burst where it hits.

Pinball

Fomite + Spread

Every bounce fires a chain jump at the nearest cell.

Chain Reaction

Lytic + Spread

Every burst arcs to one more cell outside its blast.

  • The arc deals 70% of the burst's damage as electric damage

Level 2 unlock

Power-ups

Power-ups drop from the first five cells you kill in a fight (never the last cell standing), so there's always a fight left to use them on. An elemental power-up turns up in about 1 fight in 8, with a random element; CRISPR, the rarest, in about 1 fight in 125. Several different ones can run at once, picking up one you already have adds its full duration, and all of them wear off when you enter a new organ. Numbers below are at base strength; Elemental Potency makes them stronger.

CRISPR

Ultimate power-up

Like a star: for 10 seconds you're invincible and faster, and every cell you touch is cut apart.

  • 10 s, +45% move speed, untouchable
  • Ordinary cells you touch are destroyed outright
  • Bosses, mini-bosses and tumor cores take 4× your damage every 0.5 s instead
  • The screen edges glow rainbow and a CRISPR countdown shows at the top
  • A short grace period after it ends lets you get clear

Spike Shield

Elemental · 6 s

Run over cells to shred them; nothing can hurt you.

  • Invincible for 6 s, +15% move speed
  • Each touch deals 1.3× your damage and shoves the cell aside
  • A short grace period after it ends

Chain Lightning

Elemental · 8 s

Lightning arcs out of you and chains between cells.

  • About every half second, a bolt chains through up to 4 cells
  • 0.9× your damage per cell, as electric damage

Fire Cross

Elemental · 8 s

Four flamethrower jets spin around you, setting cells burning.

  • Jets reach about 165 points
  • Hits every 0.15 s for 0.3× your damage, plus burning for 3 s

Tidal Pulse

Elemental · 8 s

Waves pulse out of you, pushing cells back and washing away shots.

  • A wave every 0.8 s for 0.5× your damage, with knockback
  • Clears enemy shots inside the wave

Gale Force

Elemental · 8 s

You move much faster and blow enemy shots back at them.

  • About +35% move speed
  • Nearby enemy shots turn around and hit cells for 0.8× your damage
  • Pushes nearby cells away

Stone Skin

Elemental · 8 s

Take far less damage while boulders orbit you, crushing cells and blocking shots.

  • Take 55% less damage
  • 3 orbiting boulders hit for 1.4× your damage and stop enemy shots

Frost Aura

Elemental · 8 s

Every cell near you is slowed, and may freeze solid for a moment.

  • Slows cells in the aura by 35% (bosses half as much)
  • Chills for 0.12× your damage every 0.25 s
  • A small chance each tick to freeze a cell for 1.2 s; bosses never freeze

Mist Veil

Elemental · 8 s

Most hits miss you, and cells in the mist are poisoned.

  • About 56% of hits drift through you (up to 80% with Elemental Potency), shown as MISS
  • Cells in the mist gain poison stacks every half second

Radiance

Elemental · 8 s

Heal over time while bursts of light burn nearby cells.

  • Heals 2.5% of max HP per second
  • A burst of light every 1.3 s for 1× your damage

Umbra

Elemental · 8 s

A wide dark aura drains cells fast to heal you, drained cells burst into shadow novas, and your shots hit much harder.

  • Drains 0.9× your damage from every cell in the aura every 0.25 s, healing a quarter of it
  • Cells drained dry burst for 1.5× your damage around them
  • Your shots deal +60% damage

Loot on the floor

Drops & Pickups

What cells, chests and rooms leave behind during a run. Pickups from one organ don't follow you into the next.

Mutation Orb

In-run

A glowing DNA orb: touch it to choose 1 of 3 traits for the rest of the run.

  • 35% of cleared fights leave one
  • Guaranteed from Mutation Chambers, solved puzzles, won Sieges and Lysis Chambers, bosses and Mutagenic rooms

Vesicle Chest

In-run

A membrane bubble you walk into to burst open.

  • 7% of cleared fights leave one, plus Mutation Chambers, puzzles, events and Hidden Cache rooms
  • 40% hold gear; the rest hold extra nucleotides
  • Always 3–6 Polymerase Shards and more nucleotides; half the time a Chaperone Protein
  • A small chance of a Dormant Virion

Nucleotides

Currency

Piles of A, T, C and G from every cell you kill, counted on the HUD during the run.

  • Roughly 35% Adenine, 30% Thymine, 22% Cytosine and only 13% Guanine
  • Nearby piles merge, up to 20 per pickup
  • Spent on Petri Lab upgrades, gear combining and more

Polymerase Shard

Material

The common gear-enhancing material.

  • About 1 kill in 5 drops 1–2
  • Vesicle chests hold 3–6

Chaperone Protein

Material

Enhances gear from +1 upward.

  • Bosses drop several, Killer T cells 2–3, solved puzzles 2
  • Half of all vesicle chests hold one

Ribozyme Core

Endless Game Mode only

The rare material for enhancing gear from +3 to +10.

  • Only drops in Endless Game Mode
  • In Infect and Pandemic Game Modes each one condenses into 2 Chaperone Proteins

RNA Strand

Pandemic Game Mode only

A rare purple strand for advanced Petri Lab upgrades and skill tree respecs.

  • Only drops in Pandemic Game Mode: about 1 kill in 40, plus Killer T cells, bosses, puzzles and tumors
  • Elsewhere it breaks down into nucleotides

Gear

Equipment

Equipable gear drops mid-run, with a NEW GEAR toast showing its level and tier.

  • Rare from ordinary cells, far likelier from elites, which also drop better tiers
  • 20% of Killer T cells drop a piece
  • Every boss drops one named set piece
  • 40% of vesicle chests hold gear

Dormant Virion

Extra life

A rare amber cyst labelled EXTRA LIFE: a stored incubation for this run.

  • Bosses 8% (not the final boss), rival viruses 6%+, tumors 4%, treatments 4%, Killer T cells 3%, Legendary-or-better elites 3%, chests 1%
  • At most one per organ, each one this run makes the next rarer, and none while you hold 3

Run Modifier Drop

Level 8 unlock

Once Run Modifiers unlock, a finished modifier can drop and go straight into your stock.

  • 3% per cleared fight, 30% per boss, and a small chance from Rare-or-better elites
  • Shows MODIFIER FOUND

Second chances

Extra Lives & Survival

A run ends when your health hits zero, unless you hold a stored incubation. Extra lives arrive with the Extra Lives mechanic (Level 5).

Going Dormant

Extra life

When you'd die, a stored incubation is spent instead: you collapse into a dormant cyst and re-emerge a moment later.

  • Dormant for 2.2 s; enemy shots fizzle
  • Ordinary cells think you're gone and lose track; bosses, Killer T cells and rivals keep hunting
  • You re-emerge at the safest spot in the room with part of your health (35% from a Dormant Virion, 40–75% with the Incubation Period trait) and 2.5 s of protection
  • Works on any death, even a fall into an abyss

Extra Life Counter

Up to 3

Extra lives come from Dormant Virion drops and the Incubation Period trait, and last only for the current run.

  • Hold up to 3 at once
  • An hourglass ×N counter sits at the end of the health bar

Challenge Knockouts

Safety net

Being knocked out during an Immune Siege or Lysis Chamber fails the room, not the run.

  • You recover to the health you came in with
  • Falling into a pit mid-challenge does the same

Healing During a Run

Recovery

Health comes back in set amounts as you make progress.

  • Clearing a fight or boss: 10% of max HP
  • Descending to the next organ: 50%
  • Refuge: 50%; Restorative rooms: 20% on clearing; stem cell niches: 12%
  • Dormancy altar: full heal; Radiance and Umbra power-ups heal over time

The SKILL button

Active Skills

Equip one active skill from the skill tree and it gets its own SKILL button with its own cooldown. Each has 3 ranks: every rank adds 35% strength and cuts the cooldown by 12%.

Viral Burst

Active skill

Blast every cell near you and knock them back.

  • 5× / 6.75× / 8.5× your damage by rank
  • Cooldown 14 s / 12 s / 11 s

Aerosolize

Active skill

Turn to mist: untouchable and 60% faster for a moment.

  • 2.0 s / 2.7 s / 3.4 s by rank
  • Cooldown 16 s / 14 s / 12 s

Seasonal Rebound

Active skill

Heal a chunk of health and take half damage for 4 seconds.

  • Heals 18% / 24% / 30% of max HP by rank
  • Cooldown 24 s / 21 s / 18 s

Move, dodge, let it fire

Controls

You steer and dodge; your virus aims and fires on its own. Play with touch, keyboard, mouse or a game controller.

Movement

Controls

A floating joystick appears wherever you touch the left side of the screen.

  • Keyboard: arrow keys
  • Mouse: hold the left button and the virus heads for the pointer
  • Controllers (Xbox, PlayStation, Switch Pro, MFi): left stick or d-pad

Auto-Attack

Auto-aim

Your virus fires on its own at the nearest cell it can see.

  • Targets hunting cells within 380 points
  • Targets unaware cells only within 210 points
  • Never fires through tissue

Ambush

Stealth

Hitting a cell before it notices you deals 2.5× damage and shows AMBUSH.

  • The hit alerts the cell, and it starts hunting you

Dash

Dodge

A quick burst of movement you can't be hurt during, with a moment of protection after.

  • 0.3 s of invulnerability, recharging in about 1 s
  • Carries you over abyss pits
  • The DASH button's ring shows the recharge
  • Dash-burst traits blast the spot you leave; Transcytosis turns it into a teleport

Signature Ability

Shift button

Your class's signature ability charges as you kill; tap it when the ring is full and glowing.

  • The button reads SHIFT (Influenza A), LATENT (Retrovirus), BLEED (Filovirus) or VARIANT (Halovirus)
  • Using it raises Detection

Ultimate

ULT button

Your ultimate charges as you hit and kill cells, and glows when ready.

  • Pandemic (Influenza A), Integration Surge (Retrovirus), Viral Hemorrhage (Filovirus), Superspreader Event (Halovirus)
  • After using it, it can't charge for 3 s; the button counts down

Keyboard & Controller Layout

Mac & iPad

Keys are laid out like a controller's face buttons.

  • Keyboard: Space dash, D signature, W ultimate, A skill, Esc or P pause; right-click also dashes
  • Controller default: A dash, B signature, Y ultimate, X skill, Menu pause (remappable in Settings)

Pause Menu

Controls

The pause button (top right) freezes the run.

  • Lists every trait you hold with its combined total
  • Lists the current room's boons and drawbacks
  • Keeps the briefings for everything you've met this run

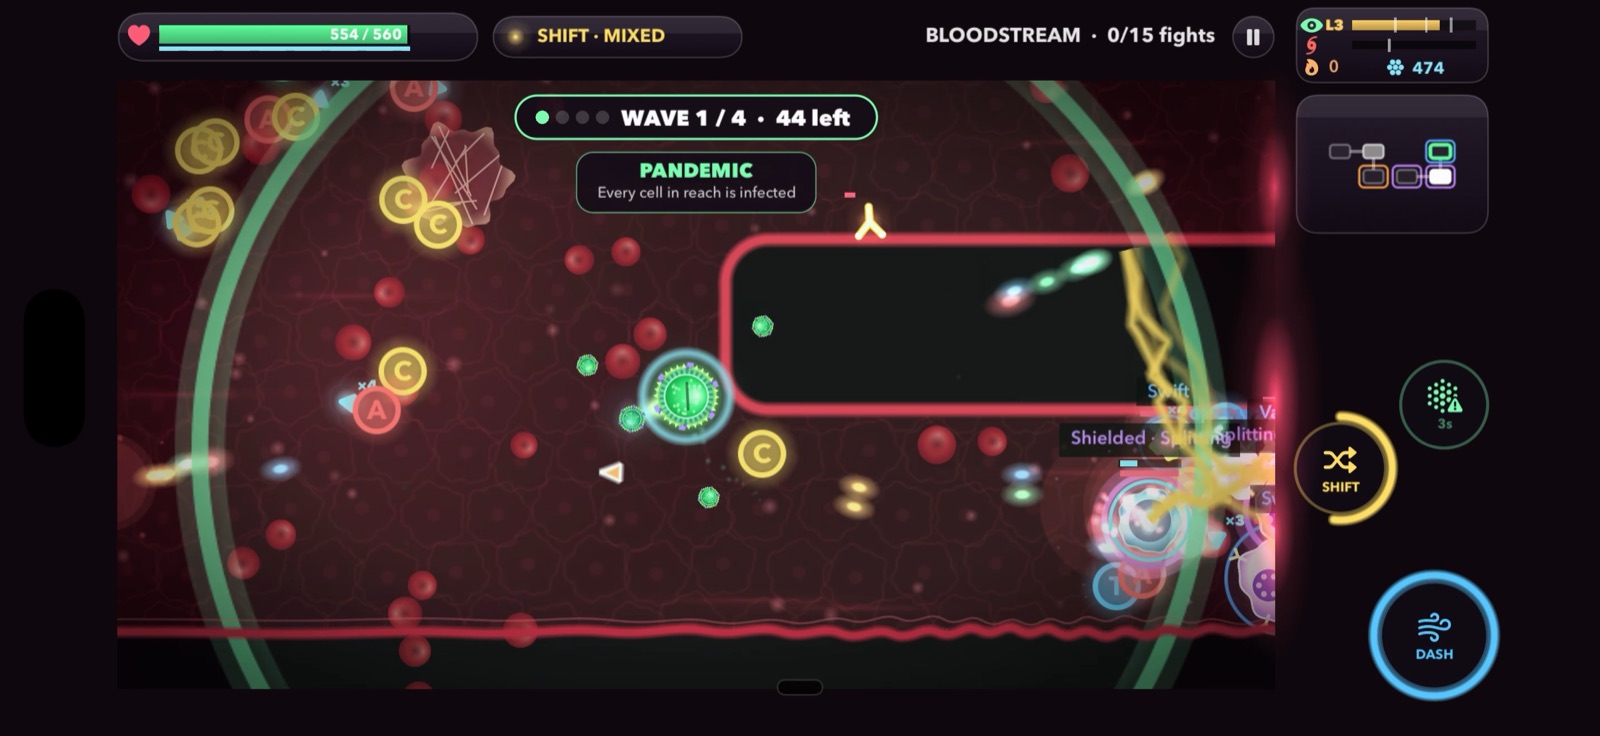
Reading the screen

The HUD

Everything you need mid-fight sits around the play window: health top left, the immune system's mood top right, buttons bottom right.

Health Bar

Top left

A heart and a health bar with exact numbers; a trail drains after each hit so damage reads clearly.

Details
  • Green above 60%, yellow above 30%, red below
  • Stolen Membrane shield and Glycan Armor appear as thin cyan and grey lines underneath
  • Below 30% health the screen edges pulse red

Extra Lives

Top left

An hourglass with ×N at the end of the health bar shows stored incubations.

Class Pill

Top strip

A pill beside your health shows your virus's live state.

Details
  • Influenza A: the current Antigenic Drift shot type, or SHIFT · MIXED
  • Retrovirus: cells stored, allies and kamikazes
  • Filovirus: how many cells are bleeding
  • Halovirus: the current variant form (Swarm, Fury or Ghost) and its time left

Organ & Progress

Top right

The organ's name and how many of its fights you've cleared, e.g. "x/y fights".

Details
  • Endless Game Mode shows the set number instead

Detection Eye

Immune panel

The eye meter tracks how aware the immune system is of you, from 0 to 100.

Details
  • Calm green, wary yellow from 50, hunted red and pulsing from 75
  • Ticks at 35, 60 and 80 mark the hunter squads; at 100 Killer T cells come for you
  • At 75+ the host may take a treatment
  • Cools after 5 s with nothing alarming it

Immune System Level

Level 13 unlock

An L-number beside the eye shows how much the immune system has learned.

Details
  • Rises with every organ you reach and every Killer T generation you destroy
  • Turns from green to red as it climbs

Cytokine Storm Meter

Level 12 unlock

A thin bar with a hurricane icon under Detection shows how far ahead your build is.

Details
  • Past its mark at 30%, the immune system sends crimson adapted cells

Immune Alert & Nucleotides

Immune panel

A flame shows the Immune Alert level, and a hexagon counts the nucleotides gathered this run.

Details
  • Alert rises one step every 20 s; each step gives new cells +6% health and makes hits on you 4% stronger

Minimap

Right column

Shows the rooms you've been in and the ones next to them.

Details
  • White is your room, grey is cleared, red is visited but unfinished
  • Special rooms have coloured outlines; tiered rooms an outer border in their tier colour
  • The boss room is double-size with a skull, dimmed once beaten
  • Sealed doors show in their gene's colour; found drop shafts get a teal dot

Genes Carried

Right column

Under the minimap, a line lists the genes you're carrying (MUCOLYTIC, FUSION, PLASMIN).

Boss Bar

Top centre

The boss's name and health bar across the top of the play window.

Wave Pill

Top centre

Shows WAVE n / total, cells left, and one pip per wave.

Details
  • Its outline turns red on the final wave

Event Timer

Top centre

During a Siege or Lysis Chamber, a countdown pill shows the time left and what's happening.

Details
  • Turns red and pulses in the last 5 seconds

Power-up Timers

Top centre

Each running power-up lists its name and seconds left, one per line.

Details
  • CRISPR gets its own countdown in shifting rainbow colours

Immune Adapting Warning

Top centre

A red line warns when the immune system has started resisting one of your shot types.

Tumor Tracker

Bottom left

Counts down to the tumor's next growth or spread, with its stage and spread count.

Action Buttons

Bottom right

DASH, your signature ability, ULT and SKILL in a staggered cluster, each ringed by its charge or cooldown.

Details
  • The signature and ultimate buttons glow when ready
  • Halovirus's signature button wears a bead wheel of its variant forms

A game that grows with you

What Unlocks as You Level

New players aren't buried in systems on run one. Each mechanic unlocks for your whole save the first time any virus reaches its level, then it's introduced in your next run: a NEW MECHANIC UNLOCKED notice the moment it first shows up, and (except the Cytokine Storm) a guarantee that it appears in that organ. Only one is introduced per run. Trait milestones follow the same level, shared by every virus in your lineage.

Power-ups

Level 2

Elemental power-ups and CRISPR start dropping from the first cells you kill in a fight.

Details
  • Also opens the power-up traits

Special Rooms

Level 3

Trade-off altars, receptor puzzles and event rooms (Siege, Mutagenic Pool, Lysis Chamber, Refuge) start appearing.

Details
  • The introducing organ always has an altar room and events

Elite Cells & Affixes

Level 4

Cells can come in stronger tiers with affixes like Shielded, Swift or Vampiric, and drop better loot.

Extra Lives

Level 5

Dormant Virions can drop from tough enemies, each an extra life.

Details
  • The introducing organ hands you one after a cleared fight

Killer T Cells

Level 6

Filling Detection to 100 sends elite hunters that follow you from room to room.

Tumors & Metastasis

Level 7

Most organs now grow a tumor that spreads over time and follows you if left alive.

Details
  • Also opens the Oncolytic Payload trait

Hazards

Level 8

Each organ's living hazards appear, along with abyss pits and drop shafts.

Details
  • The introducing organ has hazards in every fight room and at least one pit room

Rival Viruses

Level 9

Other viruses competing for the host can appear after a fight.

Treatments

Level 10

At high Detection the host may take antivirals, a vaccine booster or interferon.

Room Tiers

Level 11

Rooms roll tiers with boons and drawbacks, outlined on the minimap.

Details
  • The introducing organ upgrades about half its plain rooms to Uncommon or Rare

Cytokine Storm

Level 12

A build that gets too strong fills the storm meter and draws adapted cells.

The Immune System Learns

Level 13

Lean on one shot type and cells start resisting it; the L level appears by the eye.

Hosts & Host Traits

Generation 2

Each host now carries hidden traits, revealed when you infect it.

Status Traits

Level 2

Burning, poison, chill and shock traits can be offered.

Details
  • Pyrogenic Fever, NSP4 Enterotoxin, Cold Adaptation, M2 Ion Channel, Febrile Wake, Toxic Wake, Cold Snap, Ion Surge

Start in Deeper Areas

Level 3 · Gen 2

Skip ahead to any area you've already reached, with a 6-trait head start draft.

Projectile Traits

Level 4

Bursting, chaining, bouncing, returning and orbiting shots.

Details
  • Lytic Burst, Cell-to-Cell Spread, Fomite Ricochet, Endosomal Recycling, Satellite Virus, Syncytial Pulse, Lateral Budding

Epic & Better Traits

Level 7

Trait offers can roll purple tier.

Defence Traits

Level 9

Stolen Membrane shields, Glycan Armor and the Incubation Period extra life.

Legendary & Mythic Traits

Level 11 · Gen 4

Trait offers can roll orange, red and Prismatic tiers.

Next up

Level Up

XP, a three-branch skill tree, the Petri Lab, modifiers and hundreds of challenges.